musings between the lines

there's more to life than code

cracked

| Comments

It was bound to happen…

Sooner or later, it’s going to happen. No matter how careful, no matter how diligent, you’re going to drop your phone. And it’s going to crack the screen. More so with these new phones, like my Moto X, which are just screaming to be carried unadorned by a case because it’s just so nice to see (yes, I guess I could have gotten a bumper style protector for it).

So I dropped my Moto X, and it managed to both crack the screen and render the touch interface useless. That put me in a pickle since most solutions I saw were for mirroring your phone to your computer but still assuming your phone had retained its touch capabilities. I had lost both.

So here’s what I had to do to recover from that. But first, if your Android phone is in a situation where it could be damaged (cough, that subtly means everyone), there are some simple steps to take ahead of time that will let you avoid detrimental failures of data access should your phone get damaged.

Prepare: Enable USB Debugging

This is perhaps the most crucial thing you can do for your Android phone to enable post-destruction data access. This basically allows your phone to be accessed by your computer via USB cable. This has to be enabled for quite a lot of the solutions out there for data access to work. Do it now. Do it as the first thing you do when you get your new Android phone.

Really. DO IT NOW.

  • Goto: Settings > About phone (this may differ based on you phone)
  • Touch “Build number” 7 times till you see “You are now a developer!” pop up.
  • Go back to: Settings
  • There should now be a “Developer Options” section.
  • Enter “Developer Options” and click “USB Debugging” checkbox under the “Debugging” section.

Now a step often not mentioned:

  • Go plug your phone into every machine you have and touch “Yes” when prompted about allowing this machine to access your phone.

Tools change, and tools are written for specific platforms. This simple act will make sure you can access your phone properly on any machine in the house. Once again, if you do nothing else, DO THIS NOW.

Recovery: Get your data out

In my situation, I wasn’t as keen on performance as mere access. I just wanted to get hold of my data and export it so that I can keep things like SMS messages and other items that just are not automatically backed up (why Google, why not?). There are quite a number of solutions out there that will mirror your screen to your computer, but most of them relied on touch still working on your phone (mine was not) and often times if it did provide control, it was not at all done in a usable way (sorry Touch Control for Android).

But I stumbled upon this gem by Marian Schedenig: ADB Control

What’s nice and hacky about ADB Control is that it simply takes periodic screenshots of your screen, presents you with it, and listens for mouse and keyboard inputs. Which means it’s slooooow, but it works and does everything you would do with normal touch control including swipes. Nothing special needed, just switch from finger to mouse.

Once you have something like that working, you can use something like Helium to backup your data to your local machine (or the cloud or wherever you want). You can even continue to use your phone “normally” to do things while you get your replacement phone (although it was a lifesaver to have Moto X’s voice actions still work).

Addendum: Android backup/recovery is seriously fubar

Despite having a recovery process in place, especially in Android 5.0, I’m still quite disturbed by how poorly it works. Not only could I not get the Lollipop recovery process to recognizes any previous devices to recover from, when I tried the NFC data transfer, it really only partially worked. Lots of apps were left off and it felt really immature.

Then there are things like adb backup which seem to work great, except for a few things it cant backup (like SMS messages). I was a bit confused by that (or maybe it was my incompetence at using the tool). Either way, Google, if we use Gmail, we do have some space to leverage, why not just allow us to automatically snapshot everything periodically to somewhere like Google Drive so that we have everything backed up and ready to recover should we need to? In the meantime, Helium can do that exact job, but I just wish it was part of the whole ecosystem so that when we activate a new device, we can make a full data recovery right as the device is being initialize. And I mean full. No need to fuss with any details. Turn on new device. Specify what image to back up from, and voila, completely functional new device based on old device data. I feel like this is what the Lollipop on boarding process is supposed to do, but I just couldn’t get it to do that.

Anyway, for now, Helium is the way to go for data backup and recovery. ADB Control is wonderful for giving you virtual access to a broken phone to make it completely usable, albeit no longer “mobile”. It’s a small trade off. These two should be enough to get you by while you get your phone replaced and are back up and running again.

pediatric massive transfusion protocol

| Comments


Download the latest version


This is the second medical handout completed.

The task this time was to come up with a clearer simplification of the Pediatric Massive Transfusion Protocol used by medical staff to assess the need for various durg and blood volumes for their pediatric patients during surgery.

The handout is inspired off of a slide from ”Issues in the Management of Pediatric Trauma” by Brian D. Johnston, Chief of Pediatrics, Harborview Medical Center, which in turn is based on the data from Dehmer et. al. Seminars in Pediatric Surgery (2010) 19, 286-291.

We picked a choice of font, colors, and various demarcations to help clearly convey information as would be appropriate for medical staff. As such, appropriate lingo and abbreviations were left in and spaces were provided to account for the blood bank phone number and any contact information needed. The idea is to have this sheet printed and laminated so that the information can be adjusted as needed.

Pertinent use of colors to indicate various severities and a checklist were provided to help staff easily recognize what they need to do at a quick glance. Hopefully this will serve as a valuable quick-glance charting to spot the needed dosages and checklist accomplishments.


As always, you can download the PDF version of the handout on the Pediatric Massive Transfusion Protocol page.

Please feel free to let me know if you have any suggestions, or if something like this would be useful for your own use. This project is licensed under CC-BY which simply means that you’re allowed to use it for your own purposes, and if needed, change anything on there to suit your needs. An attribution back to the Pediatric Massive Transfusion Protocol page is appreciated, if only for the purposes of linking back for the latest information should the guidelines change in the future or if we do something new and improved. But I’ll leave that part as a recommendation rather than a requirement.

If you need a ready-to-print version that instead uses your own institution or organization specific drug dosages, feel free to contact me and I’m sure we can work something out.

pediatric preoperative fasting guidelines

| Comments

Well, this is something different for a change.


Download the latest version


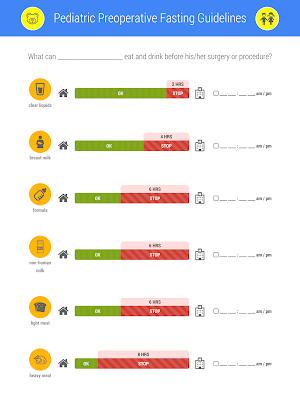
I was tasked with coming up with a design to showcase the guidelines pediatric anesthesiologists set forth for their pediatric patients prior to their surgery or procedure. Often medically referred to as the NPO Guidelines, otherwise more colloquially know as the Pediatric Preoperative Fasting Guidelines, these guidelines outline the types of foods and liquids children can take, and the duration of time before surgery that makes it safe for them to eat and drink.

The goal is to balance the duration of time patients must have their stomachs empty for the sake of improving medical procedure safety and to still allow for proper nutrition and hydration prior to their procedure. Needless to say, there are guidelines specifically laid out by the government, various organizations (ASA, SPA) and hospitals (John’s Hopkins, Orange County, to name a few). Oddly, none of the guidelines are in any form strictly mandated (from a legal perspective). That being said, there are commonly agreed upon time durations for various types of liquids and foods that parents need to be aware of prior to their child’s surgery or procedure.

The aim of this handout is to provide a visually compelling and easily comprehensible way for parents to determine what and when to feed their child, pre-hospital arrival. We wanted to make this as simple as possible without an overt use of words and other language specific terms since we can receive caretakers from all walks of life. But going completely languageless is a touch difficult, and probably impractical, so we went with just trying to be minimalist and to use iconography to help represent the different guidelines.

The result is a two page document meant as handout to be given to parents as part of their take home package. The 1st page shows the various timelines associated with the different food categories, such as liquids, milk, and meals. Each timeline will feature a checkbox and time input field that the parents can use to fill in when they last fed their child that specific item. The hope is that this will actively engage the parents in knowing what their child ate or drank, and give a heads up to the medical staff about the corresponding times, just to double check.

The 2nd page features a table adding in examples of those food groups. The list could be endless considering the number of food items there are, so it was just narrowed down to some specifics most likely for a child.

There is also a 2nd version of the 1st page meant for the medical staff to use as reference for themselves. The small change with this version is that there will be a sample name already filled in and the checkboxes and time input fields will be removed since they wont be necessary.

Hopefully this can be used as a simple reference to successfully comply with the NPO guidelines for both medical staff and parents prior to the surgery or procedure.

You can download the PDF version of the handouts on the Pediatric Preoperative Fasting Guidelines page.

Please feel free to let me know if you have any suggestions, or if something like this would be useful for your own use. This project is licensed under CC-BY which simply means that you’re allowed to use it for your own purposes, and if needed, change anything on there to suit your needs. An attribution back to the Pediatric Preoperative Fasting Guidelines page is appreciated, if only for the purposes of linking back for the latest information should the guidelines change in the future or if we do something new and improved. But I’ll leave that part as a recommendation rather than a requirement.

If you need a ready-to-print version that instead uses your own institution or organization specific guidelines, feel free to contact me and I’m sure we can work something out.

project bootstrapping

| Comments

The worst part about getting started with a project is that, well, you need to actually get started. And that’s always easier said than done. You have your ideas in your head about what it should be, and you have some inkling of the tools you want and where to start, but sometimes that initial setup and the technology choices that you need to make upfront are just a tad overwhelming, even with all of today’s tools and bootstrap kits.

So I thought I’d write myself a bootstrap outline that I can use to just get going. The neat thing about this is since it uses Yeoman, I can just run it as I want with whatever options and technology depth I want and Yeoman can take care of the nitty gritty. I just need to outline all the steps I need to take to get to the point where I can invoke Yeoman and then take care of the cleanup and preparation post Yeoman install.

Using something like Yeoman also means that I can try things out incrementally. The first step might be to configure a project that allows me to just have a html workspace to frame out the site. Once that’s done, I can then restart the project with a more interactive setup, perhaps like a single page application with AngularJS. After that, when I’m ready, I can hook in a backend and have a full fledged site.

This isn’t going to be a project starter pack like you might see on GitHub since I really wont know what I want to do yet. All I want is something basic to sandbox in and just get experimenting so that perhaps I can grow it into something more significant, dump it and restart with some different tools, or just use it for what it is and play around. Plus, making myself write out and execute each of the steps will help me improve my grasp on the various tools used in the process.

These are the step I have in place as needed for my projects on Ubuntu. It’s still a work in progress so as I figure out new and better ways to do things, I’ll keep it updated. Your steps may differ slightly depending on setup and platform, but hopefully not too much.

So here we go.

Prepare

Create and enter your project directory:

mkdir <project_name>
cd <project_name>

Check your versions:

yo --version && bower --version && grunt --version
1.1.2
1.3.5
grunt-cli v0.1.13
grunt v0.4.5

If you don’t see the last line listed, install grunt locally to the project

npm install grunt

If that throws some errors, you may have to make sure you actually own your .npm and tmp directories:

sudo chown -R `whoami`.`whoami` ~/.npm
sudo chown -R `whoami`.`whoami` ~/tmp

Rerun the version check and you should see all 4 items listed.

Scaffold

Now go ahead and run yeoman:

yo

Pick whatever options you want. For my first run at a project, I usually just go with the AngularJS settings and its defaults. The one thing I’ve noticed with Yeoman and a globally installed npm is that it will fail during the actual module fetch process of the installation. I’m guessing this is because npm was installed as root and the module directories are not user accessible. Yeoman also doesn’t really like running as root, and I don’t like giving user level write permissions to system directories, so I just let it fail. It doesn’t seem to be a problem as the proper configuration files are written out.

So once Yeoman fails, I do a manual npm installation of the modules:

sudo npm update -g

The -g in this case just tells the system to install them globally so that every project has access to it. If it makes you feel uncomfortable to work in a directory that Yeoman failed to automatically complete (I tend to be like that), you can now nuke your project directory, and redo the above steps since now npm already has the required modules, Yeoman should be happy dandy and work properly to the end.

Oh, if you run Chromium, you will also want to make sure that the CHROME_BIN env variable is pointing to the chromium binary so that “things will just work (tm)”.

echo 'export CHROME_BIN="/usr/bin/chromium-browser"' >> ~/.bashrc && source ~/.bashrc

At this point, you probably want to also setup git. Just add what’s there and commit it.

git init                        # setups the project to use git
git add .                       # add initial content
git status                      # check status
git commit -m "Initial commit"  # first commit
git status                      # should be all clear

Customize

Bower is a great little tool for downloading whatever web module you’ll need for your project. Use it to get the modules you want to play with from the repository.

Here’s a list of commands for Bower that I use most often:

bower list                          # shows what bower has installed
bower cache clean                   # cleans bowers cache for a fresh full download
bower update                        # update your modules based on bower.json settings
bower install <module>        # installs module
bower install <module> --save # installs and adds to bower.json
bower uninstall <module>      # uninstalls module
bower info <module>           # shows information
bower prune                         # clean up unused stuff

Here are some of the Bower modules I use for my projects, which at the moment is Angular heavy. Of course, necessity of these will be up to you:

bower install angular-ui-router --save                  # replacement for the standard angular router
bower install angulartics --save                        # analytics plugin for angular
bower install chieffancypants/angular-hotkeys --save    # hotkey for keyboard browsing and auto help screen
bower install angular-bootstrap --save                  # angularized bootstrap elements
bower install angular-touch --save                      # for touch based devices

The --save just makes sure that the installation information is saved to bower.json. If you’re still experimenting and deciding if you really want to keep the module, just leave off the --save. It makes it easier to just delete it once you decide against keeping it. When ready, you can just rerun the install with the --save flag.

The nice thing about Yeoman is that it now installs the grunt-wiredep module for you. Which means that in order to install the scripts and css of the modules downloaded by bower, all you need to do is to run grunt and during that process, grunt will autoinsert the right scripts and css into the right places in your html files. Very convenient.

NPM similarly offer some useful modules. These are the ones I load up:

npm install grunt-build-control --save  # For build and deployment
npm install grunt-targethtml --save     # For dynamic construction of HTML based on parameters

Configure

.gitignore: There are some changes you need to manually make to some of the configuration files to get the most out of them. One is to make sure you have a decent .gitignore file so that you’re not checking in things you don’t need to. The defaults should suffice, but who knows what files get stored in your project, so be sure to keep it up to date.

bower.json: You’ll also want to modify the bower.json file. I usually remove the need for strict versions and instead allow the system to update to at least the major and minor versions, letting the patch version get updated freely. There’s also a version number for your app at the top which you’ll want to keep up to date. Update your modules by running bower update.

...
    "angular": "^1.3",
...

package.json: There’s also another place for version numbers in package.json for the server side npm modules. You can also do the same with version numbers here as with bower if you’re confident enough. There’s also a space for your app’s version number here too. Not quite sure why we need it in both bower.json and package.json.

Gruntfile.js: This is probably the place you’ll end up mucking around the most. You’re also going to have to manually add in the new npm modules that were installed into the package.json into the Gruntfile.js file. Also be aware that with something like targethtml, which is used to render pages differently for development and production, the order where it gets executed does matter, so just be aware of that.

...
// For filerev, I've had to comment out the fonts revisioning since it didnt work well with my font loading done in the css file.
    // Renames files for browser caching purposes
    filerev: {
      dist: {
        src: [
          '<%= yeoman.dist %>/scripts/{,*/}*.js',
          '<%= yeoman.dist %>/styles/{,*/}*.css',
          '<%= yeoman.dist %>/images/{,*/}*.{png,jpg,jpeg,gif,webp,svg}'
          // '<%= yeoman.dist %>/styles/fonts/*'
        ]
      }
    },
...
// This is to make the changes to the index.html file in place once it's reached the dist directory.
    targethtml: {
      dist: {
        files: {
          '<%= yeoman.dist %>/index.html': '<%= yeoman.dist %>/index.html'
        }
      }
    },
...
// I added the last 3 items to the copy routine since it was missing.  I sometimes use a data dir for static data content.
    copy: {
      dist: {
        files: [{
          expand: true,
          dot: true,
          cwd: '<%= yeoman.app %>',
          dest: '<%= yeoman.dist %>',
          src: [
            '*.{ico,png,txt}',
            ...
            'sitemap.xml',
            'styles/fonts/*',
            'data/*'
          ]
...
// This is for deployment via a remote git repository.  You'll have to fill in your own repository and credential information.
    // For deployment: http://curtisblackwell.com/blog/my-deploy-method-brings-most-of-the-boys-to-the-yard
    buildcontrol: {
      options: {
        dir: '<%= yeoman.dist %>',
        commit: true,
        push: true,
        message: 'Built %sourceName% from commit %sourceCommit% on branch %sourceBranch%'
      },
      production: {
        options: {
          remote: '<user>@<domain>.com:/path/to/repository/production.git',
          branch: 'master',
          tag: appConfig.app.version
        }
      }
    }
...
// htmlmin does not play nice with angular, so it gets commented out.
// Also note where 'targethtml' is placed, right after 'copy:dist'
  grunt.registerTask('build', [
    'clean:dist',
    'wiredep',
    'useminPrepare',
    'concurrent:dist',
    'autoprefixer',
    'concat',
    'ngmin',
    'copy:dist',
    'targethtml',
    'cdnify',
    'cssmin',
    'uglify',
    'filerev',
    'usemin'
//    'htmlmin'
  ]);
...
// Registering the deploy command
  grunt.registerTask('deploy', [
    'buildcontrol:production'
  ]);

Deployment

Ah, this is still causing me some trouble, but I can get it to work well enough, so may as well.

If you already know where you will be deploying to, you can setup your production/staging git repository and link it to your development environment. Check out Curtis Blackwell’s setup instructions to get the nitty gritty details on how to do this. It’s almost complete, but with one change. Do not link your local git repository to the remote one. The grunt-build-control plugin will contain all the information needed about the remote repository so you don’t have to explicitly link it. In fact, the way it works (I think) is that the build process uses the git repository information in the Gruntfile.js and pulls from it to your local dist/ dir. Then it does the local build to update it with the newest content, commits, and pushes back to the upstream repository.

The process is atomic so you don’t have to worry about git state. You can even empty the dist/ directory (and remove the .git directory in there) and it will simply get rebuilt and reprocessed during the next build.

But read Curtis’ instructions anyway for the setup needed server side: My Deploy Method Brings Most of the Boys to the Yard

If you do link your local git repo to the remote deployment repository, you’re linking your uncompiled project repository to a compiled distribution repository which will not be compatible with each other. Lots of fun errors will eventually ensue especially if you accidentally push or pull. Not that I would do such a mistake…

Caveat: For some reason, when deploying, the system will create a remote repository branch and add that as a remote to my main git development repository. The result will be that git will start to complain that the commits are not in sync and you need to pull the content from the remote to stay in sync. Don’t do it. Instead, you can just remove the remote repository git remote remove remote-fc9047. Get that repo name by doing a git remote and finding the remote-xx0000 named remote branch. Then be sure to delete the .git directory from the dist/ dir.

I have no idea why this happens, and how to prevent it, but at least the fix is reasonableish.

Now would also be a good time to link you repo to your actual source code repository. Something like:

git remote add origin @:/path/to/repository.git   # Link your repositories
git push --set-upstream origin master                               # So that you can just "git push"

Now you’re set to push your source code to one repository, and your compiled deployment files will automatically get pushed to your production repository.

Run

Pretty simple to run your project. Everything is controlled by Grunt:

grunt               # runs through all the tests and checks everything
grunt clean         # cleans and reset things
grunt build         # does all the minification and optimizations in preparation for a distributable
grunt deploy        # deploys your project to your remote location (needs the grunt-build-control module and setup in Gruntfile.js)
grunt serve         # runs the project
grunt serve:dist    # runs the project with production code, a must to do some last minute checks to make sure Grunt compiled everything right

Since Yeoman preconfigures live reload support, I usually have a dedicated terminal open that’s running grunt serve.

Fixes

OptiPNG

I’ve run into an issue with opipng during imagemin’s Grunt task:

Warning: Running "imagemin:dist" (imagemin) task
Warning: Command failed: ** Error: Lossy operations are not currently supported
Use --force to continue.

I have no in depth clue as to what is really the issue, only that this seems to happen with OptiPNG 0.6.4, which for some reason is the current version on my Ubuntu (13.04). No idea why it isn’t automatically updating to the 0.7 track, but you can remove it to get around the block (or update it I guess):

sudo apt-get remove optipng

Empty vendor.js

As of this writing, there’s a severe bug in how Yeoman generates the Gruntfile.js and the index.html. Basically the left hand doesn’t know what the right hand is doing and you end up with “angular not found” type errors when doing a “grunt serve:dist”. Basically, the generation script is fubar. What happens is that the bower_components directory is now placed in the project root instead of the app/ dir and while that works fine for local testing, when Grunt builds the system, it scans the html and sees that the html is referencing app/bower_components and appends it as the path to the bower files. This causes the usemin script in Grunt to try to look for the files in the wrong place. The end result is empty vendor.js and vendor.css files in the dist/ dir.

Anyway, more about it here and the fix is here. Basically you need to adjust the build statements in your index.html:

    <!-- build:css ... -->
becomes
    <!-- build:css(.) ... -->

I’m assuming an egregious mistake like this will be fixed soon so all this may be a moot point sooner or later.

Workflow

So once everything is setup and working, my workflow usually consists of this:

* Make code changes
* git add .
* git commit -m ""
* git tag vx.y.z                # If the code requires a version bump, tag it and also change bower.json and package.json
* git status                    # Just to make sure we're clean and ready
* grunt build                   # Builds and tests everything
* grunt serve:dist              # Runs the production code.  A good last minute check to make sure Grunt generated everything correctly.
* grunt deploy                  # If the code is production ready, deploy it.

Well, and the occasional:

* rm -rf dist/.git
* git remove remote remote-xx0000

Which I can live with till I figure out what’s going on.

Feedback

So that’s about it for now. It’s a touch complicated to read over, but hopefully it can help you out in getting started with using Yeoman to bootstrap your project to your liking. Let me know of any feedback, questions, suggestions and so on.

Thanks!

robibrunner.com

| Comments

Eponymous Site

It always starts with pen and paper doesn’t it.

I first registered the eponymous domain back in Febrary… of 1999. After lazying around for a good 15 years with a default Wordpress landing page, I thought it was high time to actually do something with the extremely dormant domain. Extremely.

So here we are. 15 years later. From crappy to… at least not as crappy.

Check it out: robibrunner.com

Why?

Why suddenly after 15 years do I decide to finally do something more than a click-button-install of Wordpress? I just thought it was time to anchor my name to something other than a dreadfully default site. I also wanted to create a site that I controlled that can house data about me that is for me, by me, and with my interests in mind. I’m not saying I was slighted by any social network, on the contrary, I’m perfectly happy contributing my information to them. It’s just that there are numerous places I do things, and no single place where I can aggregate it all in a manner that I want. Especially in a selectively curated manner.

Hence, I thought it might be a good plan to -revive- create the site and use it as an aggregation point for me. Yeah, it’s one of those self serving “me” projects.

But it’s all for a good cause. Well, a good cause for me anyway. I wanted to take this opportunity to check out some new technologies out there and play with them to see what they can do, and probably more importantly, what I can do with them.

The Plan

Since the site is meant to be on the simple side, I wanted to keep it minimal and see what I could do. No fancy logins or backend systems. No need for cluttered widgets or ads. The plan was to write a Single Page App running completely just with client code, perhaps with a json file containing the data I wanted to display. That’s it. Nothing complicated.

This gave me an excuse to try out things like Yeoman, AngularJS, and all the assorted goodies that come with those stacks. And it turned out to be pretty interesting to see what was out there.

The Design

I’m not much of a designer, but I do what I can. I wanted something that would becon a little user interaction. There’s probably a choice to be made here between providing a page that has everything already laid out and visible so that all the user has to do is scroll, and a site that tries to entice the user to interact with the various elements and see what goes where. Common instinct tells me I shouldn’t make the user do any extra work to see my content, but at the same time, my own gut tells me that I want to build something compelling enough that makes the user want to interact with the site. If I can’t get them to at least be that engaged, I don’t see a point in just spewing out content.

If I can’t engage the user enough that they want to read my copy, then I’ve failed anyway, and no amount of no-interaction-needed style of page display will help them grasp my content.

So that was my mindset. You’re going to have to do some work to see what I do, and I hope it’s interesting enough that you will.

The Execution

As mentioned, Yeoman was high on my list to try out since it frameworked everything I would need for this site. It created an Angular project, droped in Grunt so that I can build it, configured it with some sensible defaults to do things like pack js and css files into one and minify images. It also installed Bower to grab all the nifty libraries I may need and pack them into the index.html. It’s a pretty nice setup where once setup, I can take my time to browse around the various files it configured and see exactly what it did. Nothing better than to learn from a few live examples.

Oh yeah, there’s also testing included too. That one I still need to leverage fully. When things are rapidly changing, especially in the beginning stages of an application, I feel like it sometimes takes way too much effort to write full scale tests. That’s just something I need to get into my workflow a little more to make it work right.

The site also needed to be responsive to work on mobile devices, so I had to dive into a little bit of CSS hacking to make things look right. Adjust element sizes, column counts, and so on to accomodate for smaller displays. For better or worse, everything needs to be designed with mobile in mind, if not mobile first, even for this kind of site. It’s certainly a paradigm shift.

I wont go over too much in detail what I did, simply because I used the Info section to document the details of what I used to make the site what it is. Web page design is never a trivial matter, even if it’s a mere one page app. Hopefully the attributions to various modules, stackoverflow answers, and technologies used can be insightful to someone else that may be interested in seeing how I did what I did (not that it’s anything overtly complex), and more importantly, use it to do what they want with it.

The underlying code is still slightly embarassingly messy, as it was a learning process. The Angular directives, services, factories and controllers I wrote are nothing particularly share worthy, but more importantly, it gave me a good feel for how they should be done and what I can do with them. I’m really liking the way Angular works and I think it’s a huge paradigm changing way for writing Javascript and doing web development. As they say, things wont be the same after this.

What’s Next

A learning experience can only validate itself if it gets applied to something else. So naturally, onto the next project. The next project will be incorporating a back end, probably MongoDB, or maybe even Firebase. But I’m still not sold on outsourcing everything to the cloud when I can have a perfectly reliable server in my own control. Perhaps that’s one thing I need to still get used to.

It may also require some sort of user backend, which implies a login system, which implies an authentication plan. I’ll have to first decide if I want to write it as a Java back end, or to go with something like Node.js and Hapi/Express on the server side. Either way, it looks like I’m going to have to upgrade my domain hosting plan to allow for me to do something a little more complex. Well, maybe if I go Firebase, I can avoid that. A little more thinking needed on my part, but we’ll see how it goes :).

Feedback

Feel free to visit the site: robibrunner.com and let me know what you think. Tear it apart or question why I did something in a particular way. I’m always up for a little discussion. I’m sure there’s a lot to add or perhaps some things that just are plain wrong that I’m blind to, but either way, it was interesting to kick the tires of modern web development. Things sure move fast :).

yeah, I know. 15 years. Cause 16 would have been just too ridiculously long :).

development diary - Jan 2014

| Comments

January 2014

I have no idea how short or long these things will be, but I thought it’ll be a nice attempt to keep myself honest and maintain a development diary so that I’ll be forced to account for my time and actions over the course of the year, one month at a time.

Some items may be a bit cryptic since there will be some projects I’m working on that I’m not quite ready to talk about in specifics, but at least it’ll get some sort of mention. Either way, a progress report is due, so let’s start with January of 2014.

  • core : I’ll cheat a little and bleed into December, but basically I’ve wrapped up some of the major features of the system that I wanted to have in place. It’s working, but as usual, not quite as well as I like. The basics are there, but it’s far from intuitively usable, hence no real announcement. I still need to properly build out a new user module separate from the core module that will stack on top to give the foundation for genuinely starting a bootstrap site.

  • authentication : Not too much here. Just a little cleanup to fix some code that broke the Persona system from working right. Actually, it was the sample that wasn’t working. The backend code catching the Persona requests were just fine.

  • project “ab” : We sat down for an initial chat about what we wanted to get out of the project. Got some servers and logins out of the way and wrote up a quick milestone chart to see when we’ll get to some interesting publicizable code. Let’s see how it goes. Lots to do here.

  • misc : Getting my thoughts in order for what type of projects I want to tackle. I have quite a few in mind, but making myself narrow it down to a handful that I can work on. Some will be just casual tinkering on the side and others will require a little bit more effort. Will have to be careful not to have them bleed out too much time from each other.

I have no idea how long this will last. Image sourced from Red Bonzai

user profiling

| Comments

User Profiling

Nearly every system that has any type of persistent user identification needs a profiling system. I’m in the process of writing a framework (more on that at another time) that will let me kickstart future Java projects with a sound base like data storage and retrieval, json based REST APIs, and agnostic web framework containment. So naturally, a starter base for a user system would be something nice to have.

The question then becomes how to write it in a generic manner that wont be too specific to a particular instance of an application but also not too generic that it starts to become too nebulous and not tight enough for use. So choice have to be made.

Part of that will be that the user subsystem will probably be an abstract implementation. It’ll contain the basics that every profiling system should have, and then leave the details of the rest to a higher level implementation. This should achieve the goal of saving time getting the structure in place and the rest becomes filling in the implementation details. The reason for even wanting a user subsystem in first place is to start to enable some basics editing authorizations for the other systems in the core framework. I’m hoping that having, at least in abstract form, a more concrete user system will allow me to start to issue these authorizations at a lower framework level that can then float up higher as more pieces are implemented. Less work later on if a foundation is laid for the basics. Or something like that.

Pieces

I just wanted to start to review the general pieces of a usable user subsystem and what it should have in order to act as a reasonable base for most projects. I’m willing to have it be a little opinionated in order to satisfy most projects that might need this type of thing, but also willingly exclude some the edge case projects. I figured with those, I can actually fork and refactor the code as needed instead of extending and implementing it.

I’ve designed and built profiling systems in the past, but they were rebuilt each time for each project as needed. Also, being internal to a company, there were vastly different data association requirements (no need for name/email verification, tertiary data store for person information, etc).

At the moment, this subsystem is just getting off the ground, so I haven’t decided yet how granular it will be. Do I store some very generic preferences with the main object? Do I split those out to a separate named object? A generic preference association system? How detailed should it become - track login times? Track it with location information? Keep a history of all login timestamps and duration?

It’s going to be useless to accommodate all possible combinations between projects that want that type of granular information and others that don’t, hence I’ll probably just decide on what most of my projects may need and start from there. In the end, if I build into it a concept of a generic preference storage system, it may suffice for most cases. We’ll see.

Design

So, here are some of the data points about a user that would be convenient to have in a profiling system:

  • Unique System ID - Internal identifier
  • Unique Username - External identifier
  • Display Name - Common societal name
  • Email - More for contact/news delivery purposes
  • Email Verified - Just to make sure the user is who they say they are
  • Is Admin - Simple administrator flag for special access
  • Date Created - Date account was created
  • Date Updated - Date account was updated by the user
  • Date Touched - Date account was accessed by the user
  • Date Deleted - Date of deletion request (if deletion is delayed or if the account is simply removed from visibility)
  • Date Logged In - Date of last login.
  • Associated Accounts - 3rd party accounts used for login. From the Authentication Module
  • Preferences - Simple key/value preference pair storage system

Kill it with fire

One normally salient piece of information missing is “Password”. I’m not going to use one, nor an option for a traditional login. Everything is going to be dependent on some form of 3rd party login that the user should have access to. I do not want to be in the business of storing and securing password information, especially since it raises a lot of security concerns, and it feels like a disservice to store it, even if salted, because it forces to the user to have to create and maintain yet another password, which will undoubtedly be a copy of another password from another site.

By eliminating it, it protects this system from compromises elsewhere, and protects other systems from compromises to this one. So instead, I’ll rely on login via sites like Twitter, Google+, Facebook and even Mozilla’s Persona system in lieu of having a direct login. They can offer the ability to remove access to the project should a compromise occur. It’s a tradeoff with a reliance on a 3rd party system and better (perhaps falsely optimistic) security. It’s the day and age of the interwebs, we’re all going to be connected and networking is almost ubiquitous, so it’s a good time to start taking advantage of it.

Will this cause some issues further down the road should these systems be offline or meet their hype demise? Possibly, but I think some of that can be mitigated by enabling the user to tie in several systems together to offer a variety of ways to get into their account should their preferred one go the way of the dodo.

At any rate, this will be one of the opinionated ways in which I’ll be designing this system to see if it’ll be something that can be sustainable.

Feedback

Let me know of any additional thoughts on what should be here. I’m sure there’s a lot to add or perhaps some things that just are plain wrong that I’m blind to.

It’s been eons since I’ve written a profiling system… Image sourced from somewhere completely random

maven workflow

| Comments

Maven Workflow

I stumbled upon Maven much much later in my Java career than I should have. But now that I’m here, I’d like to leverage it for my needs. It’s a pretty versatile system that can do quite a lot. I’m sure much more than I’d care to explore. I’m not going to really introduce it as there’s enough on the web you can browse to basically get the hang of what Maven is about and what it can do for you.

For the purposes of this post, I’m going to catalog some of the things I did to configure Maven so that it can accomplish my workflow goals. Namely:

  1. Create a Java project that can be managed by Maven and developed in Eclipse.
  2. Commit to a source control management system.
  3. Install to the local Maven repository so other projects can use it.
  4. Run the project in a web container.
  5. Sync the content to an external repository.
  6. Deploy releases of the project as a zip and to a maven repository.

If you need an introduction to what Maven is or the exact inner workings of a pom.xml, this post wont be that. But if you want to take a peek at some of the things I’ve clobbered together in the pom.xml, and perhaps have any other neat suggestions, feel free to take a look and contribute some of your own solutions.

Commands

But first, a little bit of a cheatsheet for the commands I most commonly use in Maven:

  • mvn clean : Return the project to base state. Basically removes the “target” directory.
  • mvn package : Create the jars and packaged items (like wars) from your code
  • mvn install : Install the project to your local repository. Keeps any -SNAPSHOT monikers used.
  • mvn deploy : Pushed the installed project to remote maven repositories.
  • mvn release:prepare : Prepares the project for release. Be sure to check in all your code first else this will faile. Also the release process will automatically remove any -SNAPSHOT monikers from your version and allow you to specify the next version to update to. Pretty convenient.
  • mvn release:perform : Once prepared, actually performs the release. This means doing any install and deploy calls.
  • mvn release:clean : Cleans up the release details like the property file and so on. Especially useful if you forgot to checkin prior to doing the prepare stage. Although the plugin is smart enough to continue where you left off, I usually just like to have a clean start all the way through.
  • mvn release:rollback : Rollsback a release to the previous version. I haven’t quite used this enough to really make use of it yet.
  • mvn war:war : Explicitly creates the packaged war file for a project. Even if the project is specifying a packaging of jar.
  • mvn tomcat7:run : Runs the project in a tomcat environment. No need to explicitly create a war via the pom.xml or to execute war:war. It’ll just do it.

pom.xml

And the related pom.xml I’ve crafted to get the steps above done. It took a while to cobble it together and it’s still not quite fully there, but close enough. I’ll use the authentication module’s pom.xml as an example. See the version this post is based on: pom.xml and perhaps to what it has currently evolved: pom.xml.

1. Create

I’ve listed the creation step as a formality since I need to remind myself how it gets done. However, I already did that with the maven setup post, so go there, get setup, and come back.

2. Commit

Once your project is there, all you basically need to do is to git init in the directory and you’re all set. Most of the useful commands I use git, including some setup tips, I’ve cataloged on the git cheatsheet post.

3. Install

I usually write components and frameworks where one project will rely on another. So it’s important to have a way to nicely package and install these projects to a central location from where it can be synced. Maven offers a local repository to do just that. All you need to do once you’re ready is to do a:

mvn install

and the code should get packaged and installed to your local maven repository. Then other projects can simply add their dependency for your project based on your group and artifact ids (and version). Now why bother doing this if Eclipse can simply link the 2 projects together? It’s just more universal. You wont be tied down to Eclipse to manage the interconnection and if you want to reuse your component in something like a Play Framework project, it’s a trivial addition to add your local project just like you would any other public project. It’s one of those that’s simple to do and just better in the long run to get used to.

4. Run

Often times, even if I’m creating a component piece, I may want to include a simple showcase just to help the end user/developer visualize what the project is about. Normally, by Maven convention, you would have a base <packaging>jar</packaging> project and a related <packaging>war</packaging> project inked to it for the simple application. But I find it to be rather cumbersome to have 2 projects just for a simple showcase.

So instead, you can actually get away with telling maven to create your project as a web app, change the packaging to “jar” in the pom.xml, attach the tomcat plugin to it, and just tell it to ignore the packaging and run:

<plugin>
  <groupId>org.apache.tomcat.maven</groupId>
  <artifactId>tomcat7-maven-plugin</artifactId>
  <version>${tomcat7-maven-plugin.version}</version>
  <configuration>
     <ignorePackaging>true</ignorePackaging>
    <url>http://localhost:8080/manager</url>
  </configuration>
</plugin>

Magically it treats your jar project as a war (provided you created it as a web app) and just makes it run in the tomcat environment via this command:

mvn tomcat7:run

I had actually experimented with trying to keep the packaging as a war and telling maven to export just the jar into the local maven repository for shared use, but for some reason, it would always copy the .war over to the local maven repo as the .jar, which essentially broke all the downstream projects. I’m not sure why this happens, and a similar issue seems to simply have been closed.

So now I keep it packaged as a jar and if, for some reason, I actually want the war, I’ll use the mvn war:war command. Otherwise, the mvn tomcat7:run command works just fine.

5. Sync

For public projects, I, like quite a lot of developers, decided that GitHub can get that honor. For a simple sync of the code, it’s nothing more than your usual git push to push your code to GitHub. But a release deploy is a little different.

6. Deploy

Not only do I want to sync my code to GitHub, I want to use GitHub as a release hub for my code. This means that I would like to have my code packaged as a zip file, version tagged with the current version number I’m working on, upload it to the “Releases” section in GitHub, and increment my local version to the next iteration so that I can continue to work on the next version right away.

Not only that, I’d like to be able to offer my code to a Maven repository so that others can access it via Maven (or sbt) instead of downloading it. While officially, you’ll probably want to formally release your code to somewhere like Sonatype’s system so that your project will hit the main Maven repository, I just haven’t gotten that far yet. In the meantime, you can apparently just create a branch in GitHub to host your code. Sounds like a good compromise solution for the time being.

Luckily, GitHub offers a plugin for all this. You will have to modify a few things to make it work:

  • Add your GitHub credentials to settings.xml
  • Add a distributionManagement section to the pom.xml
  • Configure the maven-release-plugin to use the version format you want (or if you don’t care, no need).
  • Configure the site-maven-plugin with your desired details for release and maven repository publication.

Once all that is complete:

mvn clean
mvn release:prepare
mvn release:perform

should get you rolling. It’s going to ask you versioning information and so on about your release and incremental version. It’s not too bad, but be sure to commit your work first, else the process will fail and you’ll probably want to mvn release:clean before trying again just to make sure you get a proper clean start. When all is said and done, you should see your releases section populated and the named repository branch should have your latest release ready for public use. The repository for people to point to will be something like this:

<repository>
  <id>com.subdigit.authentication</id>
  <url>https://raw.github.com/subdigit/authentication/mvn-repo/</url>
  <snapshots>
    <enabled>true</enabled>
    <updatePolicy>always</updatePolicy>
  </snapshots>
</repository>

The one catch though is the plugin cant seem to do a nicely formated native release. So be sure to click on the version number of the release and edit it manually. Add whatever description you want and any other details, save, and it should look a whole lot better.

Suggestions?

I hope this helps. It’s nothing special, just something I want to use to help automate my project maintenance/publication workflow. I’m sure there are a lot of improvements that could be made and other neat tips and tricks to shove into the pom.xml, so if you have any, I’m more than happy to entertain suggestions.

Thanks!

I hope this takes care of a lot of the administrative stuff I dont really care to think about too often. Maven image sourced from ideyatech

google+ and youtube

| Comments

While in general, I do approve of the whole commenting system overhaul of Youtube, I thought I’d go check it out first hand. I’ve never commented on any Youtube videos in the past and only read the comments out of sheer amusement at the internet trolls.

So from that perspective, getting rid of the trolls is certainly a plus (and a minus for amusement value, but I’ll deal with that).

The issues I have though are with execution.

I like that the videos I share from Youtube show up [a bit incorrectly] as a “comment” to the video on Youtube and all subsequent replies here also show up there. (Can we please do that with public Communities?)

But for some reason, I have to unblock 3rd party cookies in order to get commenting to work. Took a while to figure that one out as blocking those seemed to be the default in my browser (Chromium).

And the source of most amusement, being able to click on “in reply to” links are now all broken for me. They simply open the video up in a new tab and loads it up fresh. I can’t see the parent reply inline at all anymore. Not sure why it was decided not to thread native Youtube comments as it threads Google+ based comments. (simple answer, structure and depth is not the same.)

Clicking on my name takes me to my empty empty profile on Youtube. If it knows that I’m also on Google+, it would be nice if it either prepopulates my Youtube information with G+ info, or at least prominently displays where to go to see more about me (preferred).

Reshares in G+ show up rather awkwardly in Youtube. It makes no visual sense and just looks like a random item or someone reposted a comment I made. It just makes no sense to the user upon quick inspection.

Also… I have no clue how to reply to comments native to Youtube. I can only assume that I cant because these were made before the Google+ update and any comment from now on can only be replied to if it came from an “approved” Google+ account? If that’s the case, I can totally understand the absolute outrage Youtubers are feeling about the comment system. Legacy is legacy, those still need to be functional. I’m assuming those are blocked for replies simply because they were not able to [or purposefully] uniformly integrate the legacy youtube comments with the new style of comments.

It’s a harsh way to expect the huge youtube population to essentially move overnight to G+ in order to continue being able to comment and reply. Outrage noted and approved.

As for execution, there is certainly much to be desired to clean it up and make it a bit more uniform and have it work smoothly. I’m a bit disappointed that it feels really hacked on instead of built as a well integrated system with Google+ with a unified threading system. You can’t have 2 different style of threading in one commenting system. That’s a complete user experience disaster and +Yonatan Zunger and company should really know better.

It would have been so much better to do a full legacy integration and start phasing out the old Youtube profile in phases to allow the transition to happen a little more gradually as people get used to (and eventually matriculate properly with the new account). Time pretty much makes people forget everything, and for a big change like this, rushing it with a mixed system wasn’t the most pleasant thing to do.

That being said, I live on G+, so I’m pretty comfortable with the controls it offers. I don’t need to share new comments to G+, and if I do, I can limit what circles see it.

My profile can show or hide most information I want, so in that sense, it’s sort of anonymous, but certainly not as anonymous as youtube accounts were. But that’s also part of the point. The whole trolling aspect is completely out of hand to make the site usable for the majority. This is a double edged sword of punishing the majority for the actions of the minority, in both situations. A relatively small number of trolls prompt a revamp away from anonymity, a smaller G+ population forces Youtubers to have to migrate to the new network or basically be banned.

If Facebook owned Youtube and forced me to log in only using Facebook just to post or comment on a video, I’d certainly have doubts. If I was a pre-migration user, I would certainly expect to be allowed a legacy account. But seeing that the controls offered over G+ based accounts are not transferred to the “regular” Youtube comments, it’s going to be a moot point to allow continued existence and use of those legacy accounts since there’s no way to prevent the already existing trolls from still being trolls.

If only the system was better integrated instead of slapped on, we could be using Google+ controls to filter out what we would consider the older youtube accounts to see only the new, more relevant content. Old users can stay where they are, but by moving, they get far better control and identification benefits. It could have been a very tempting optional migration path.

The process will indeed have been slower, but it’ll be much more of a transition as the desire to want to participate can move legitimate users into a system they have more time to get familiar with and will simply leave the trolls where they are. Or if the trolls also migrate, it makes them much easier to identify and manage via controls.

Overall, the concept of better accounts and the controls that come with it is undoubtedly a good one, the execution was poor. The rough dump of users from one vastly different system to another is pretty woefully done. This is where it’s the responsibility of the system owners to transition, not convert. To take heed how to entice users to want to move rather than just forcing them to. Force implies the lack of confidence in providing a service that will be transitioned to and that implication is probably far worse than what any troll could have done to both Youtube and Google+.

media rights

| Comments

tl;dr: Wouldn’t it me nice if we could actually own the rights to watch and engage with media in ways we see fit instead of being told what’s best (for them)?

Physical or Streaming

This concept makes the rounds once in a while: Whether it’s better to have something physical to keep and use, or to rely on a streaming service to provide for you so that you have the convenience of anytime anywhere. Both ways have their pluses and minuses. I probably wont exhaustively cover every aspect of it, as something like this has been written about all over the place. I’m just going to focus on the portions of these issues that I find interesting and relevant to my needs.

First off, my bias is that I’m a physical disc person, not a streamer. Oddly, it’s a contradiction, but I find at times more tedious to get things right with a streaming service than to actually have physical media in hand to leverage. I can certainly understand viewpoints like that of +Sarah Price who sees value in streaming where you get [almost] ubiquitous viewing on any device anywhere. But maybe because I’m more of a home based person, I tend to usually watch things on desktop or TV. I don’t have as strong a need for mobility as whatever is around the house is hooked up to play physical media or disk drive media.

Rights and Ownership

So what’s the real issue here? It’s not really about disc vs streaming, it’s far more about ownership and rights and content availability.

I like the “extras” that are available on hard media. I turn on subtitles for everything (they just help me grasp the story better in times of heavy dialog). I enjoy the extra features, cut scenes, even trailers for upcoming titles. These are all usually sacrificed on the streaming version. I just can’t understand in this day and age why the concept of a complete package isn’t present with how streaming media is rendered. Subtitles certainly should be an easy thing to get done. The packaging of the extras, or lack there of, really seems like a form of punishment for wanting to “cheap” out by getting the streaming version instead of the hard media.

But back to the core issue. Technically, in neither case do you actually own the movie (or software). What you do have is the right to view it, but that’s about it. If I wanted to watch a DVD on my Linux machine, legally, I really don’t have too many choice. Blu-ray? Forget it.

Streaming

I like that with streaming, you get that ubiquity and omnipresence of your content… to almost everything. Well, except Linux machines cause they’re so insecure… If new resolutions are available, not a problem, upgrading should be automatic. You get the convenience, but you sacrifice control. You lack things like accessibility, subtitles, special features. And the company you’re renting your streaming rights from may go broke. Then you’re left with nothing. A reality check that you were indeed just renting the material.

Physical

With hard media, you’re still “renting”, but with a little circumvention, you can own your content. Convert it to a portable media format and you have your content where ever you want. You can take it with you on your devices, put it in the cloud and do whatever with it. Want to preserve the whole DVD experience? Sure. Need to minify it for the phone? Sure. But it’s work. You need to be prepared and sync your content and/or you need to host it somewhere accessible, then download it to the device. It’s a pain for most, and an unnecessary use of disk space, but you have the control.

“Owning”

I strongly believe in the right to be able to watch media you’ve purchased in a way that you want, when you want, on what device you want. With hard media, you can achieve that. Unfortunately you break the law for that convenience since apparently it’s illegal to “have it your way”, but at least it’s possible.

Hence, here is my gripe with the media industry in general.

We’ve never bought anything since the advent of the tape and vinyl days (and probably earlier). Not a song, not a video, not an ebook. Nothing. We’ve always been renting it. Or rather, renting the rights to engage with the medium in the format you purchased the rights to. And as such, those rights can be revoked without warning, at any time, for reasons beyond your control or even comprehension. Look at what happened to Amazon’s ebook “recall” from a while back. One day you had “1984”, the next day it was removed from users’ kindles despite having paid for the right to read it.

You can’t do that with a physical book or any physical media (ignore a Fahrenheit 451 scenario). But I’m sure they would love to be able to enforce that.

Which brings me back to my long winded point. The media companies want control. Total and absolute control. Which is why streaming is the best solution. They have total and utter control over every aspect, and you get none. As in absolute zero. Yes, maybe you can rip the stream, but they do make that harder than copying a DVD.

If one day, they decide you no longer can stream to your iPhone because of a dispute with Apple, they can do that. If they decide your Android phone has a screen size that’s too large to consider it a phone, they can charge you more to stream to it instead. New 4K streaming capabilities == A new charging tier. $4.99 not enough for 1080p, they can simply serve you 720p instead.

Your rights and the concept of “fairness” is of no concern. Which is why in some sense you need to be able to protect what should have been immutable. You paid to watch something. In common sense terms, that implies you paid to be able to watch it when you want and how you want. I think we deserve that much when paying for a season of TV or a movie or an album. Technically, I think you certainly deserve that in addition to the BD, DVD, Streaming option you paid $24.99 for. You really should have the right to reformat and repackage as your needs dictate.

And in some sense, I don’t think the media companies actually worry too much about the legitimate use of their media for your use. They’re worried you’ll copy it then distribute it. But that’s a discussion for another day.

Common Sense

I think that’s what’s missing here. Common sense control abilities for my rights to view media. I want to buy the rights to view my media in whatever way I want. I want to be able to purchase my “rights” that allow me to view a movie how I want, when I want, where I want, using whatever I need to make it happen. If I want subtitles, if I want special features, if I want it in 1080p or 4K or 10bit or mkv or with director’s commentary. I simply want the ability to buy my right to do so.

In that case, I don’t mind paying a bit more. But please, let’s be reasonable. $24.99 for a BD/DVD/Streaming combo package is nice, but that really should be the upper limit for the concept. Just give me the rights to store it on a computer, or give me the same content in streaming I have on physical media. Just one way or the other, let me buy my rights. I’m not saying I should have the right to distribute it to anyone else, I just want the right to legally burn a spare copy, or to rip it to my HD, or to encode a version with soft subtitle and load it onto my tablet to watch on the plane.

That, for now, is the reason why I still prefer my hard media. It still offers the choices and ways I want to watch things. Yes, it sacrifices the ubiquitous convenience of streaming, and if you’re a traveler or need to have things on the road a lot, this may just not be convenient enough for you. But for me it is. And for me, streaming is not that altruistic solution that’s future proofing my media, it’s simply a way to leash control onto you and relinquish you of any rights you thought you had (which you never really had in the first place).

Something needs to change. We need a bit more fairness in this public vs big media battle.

fbi warning image from here, which I guess in it of itself is questionable if I am using it in fair use